Unveiling the Art of Batik: Your Beginner’s Journey to Toba-Inspired Designs
Ever admired the intricate patterns and vibrant hues of batik fabric and wished you could create something similar? The magic of batik lies in its unique resist-dyeing technique, allowing you to craft stunning, personalized textiles. And if you’re looking for a rich source of inspiration, the indigenous art of the Batak people of North Sumatra, often referred to as Toba-inspired designs, offers a treasure trove of captivating motifs and symbolism. This guide is your first step into the captivating world of batik, empowering you to bring your own Toba-inspired creations to life, even as a complete beginner.
What is Batik? Understanding the Ancient Art
Batik is not just a fabric; it’s a story woven into threads. At its core, batik is a technique of wax-resist dyeing. Liquid wax is applied to fabric in a pattern, and then the fabric is dyed. The waxed areas prevent the dye from penetrating, creating intricate designs when the wax is removed. This process can be repeated multiple times to achieve layered colors and complex patterns.
Historically, batik has been practiced across various cultures, with Indonesia, particularly Java, being a global center for this art form. The beauty of batik lies in its versatility – it can be applied to clothing, home decor, and even as standalone art pieces.
Diving into Toba-Inspired Designs: A World of Meaning
The Batak people of North Sumatra have a deep cultural heritage expressed through various art forms, including intricate carvings, weaving, and of course, batik. Toba-inspired designs are characterized by:
- Symbolism: Many Toba motifs carry significant meaning, often related to nature, spirituality, fertility, and social status. Understanding this symbolism can add a profound layer to your creations. For instance, gora-gora (spiraling patterns) might represent the cycle of life, while mana-hasi (bird motifs) can symbolize freedom or messengers.
- Geometric Precision: You’ll often find a beautiful interplay of geometric shapes, including triangles, diamonds, and rondels (circular or oval motifs). These are often meticulously arranged to create visually striking compositions.
- Natural Elements: The natural world is a constant muse. Expect to see stylized representations of flora and fauna, such as ulos (traditional Batak textiles often incorporating spiritual and social significance) motifs that echo plant life and animals.
- Bold Contrasts: Toba designs often utilize bold color contrasts, making the patterns pop.
Getting Started: Your Batik Toolkit
Before you start creating, gather your essential batik supplies. Don’t be intimidated; many of these items are readily available from craft stores or online.
- Fabric: 100% cotton is ideal for beginners as it holds dye well and is easy to work with. Pre-wash your fabric to remove any sizing that might interfere with wax or dye penetration.
- Wax: A blend of paraffin and beeswax is commonly used. You can purchase pre-made batik wax or create your own.
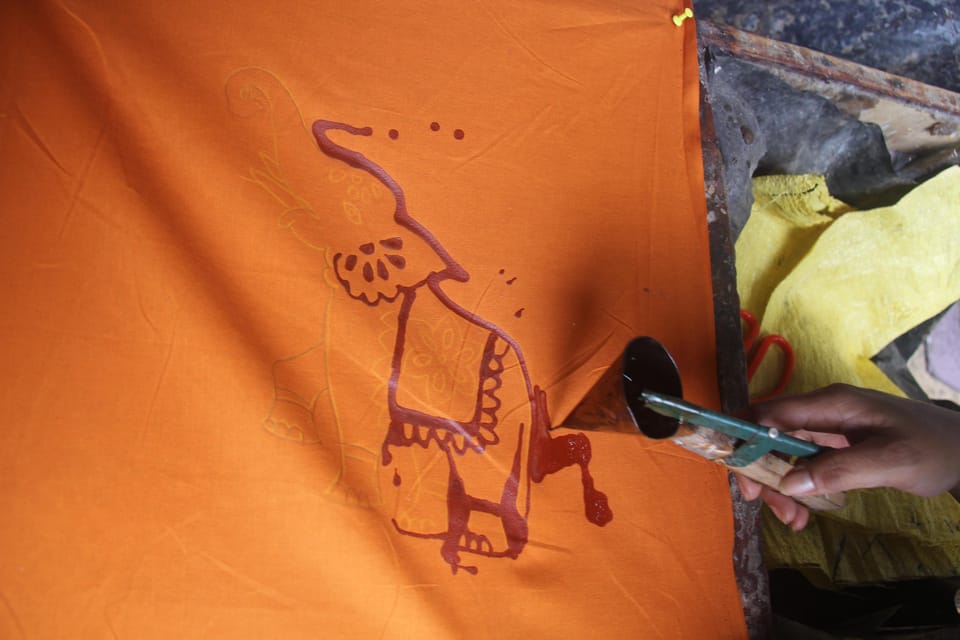
- Tjanting Tool: This is the traditional tool for applying molten wax. It has a reservoir and a spout to control the flow of wax.
- Brushes: Various sizes of brushes can be used for applying wax to larger areas or for creating softer lines.
- Dyes: Fiber-reactive dyes are recommended for vibrant and colorfast results. Ensure they are suitable for cotton fabric.
- Buckets/Containers: For mixing dyes and rinsing fabric.
- Iron and Absorbent Paper/Cloth: For removing the wax after dyeing.
- Optional: Stencils can be helpful for beginners to achieve precise Toba patterns.
The Batik Process: Step-by-Step
Let’s begin your batik adventure!
Step 1: Design and Transfer
- Inspiration: Browse images of traditional Toba batiks or sketch your own interpretations. Focus on simple, bold motifs to start. Consider translating the symbolic elements we discussed earlier.
- Transferring the Design: You can draw your design directly onto the fabric with a pencil or transfer it using a light source and paper. For more intricate designs, consider using stencils.
Step 2: Waxing – The Resist
- Melt the Wax: Gently heat your wax blend in a double boiler to prevent scorching. Maintain a low, consistent temperature.
- Apply the Wax: Using your tjanting tool or brushes, carefully apply the molten wax to the areas you want to remain undyed. Think of the wax as a protective shield. For Toba-inspired designs, focus on the outlines of your chosen motifs.
- Drying: Allow the wax to dry completely before proceeding to the dyeing stage.
Step 3: Dyeing – Adding Color
- Prepare the Dye: Mix your fiber-reactive dyes according to the manufacturer’s instructions. You’ll need separate dye baths for each color you plan to use.
- Dyeing: Immerse the fabric into the dye bath. Stir gently to ensure even color penetration. The longer you leave it in the dye, the deeper the color.
- Rinse and Dry: Once you achieve your desired color, carefully remove the fabric from the dye bath and rinse it with cold water until the water runs clear. Hang it to dry.
Step 4: Wax Removal and Repeat (Optional)
- Remove the Wax: Once the fabric is dry, place it between sheets of absorbent paper or cloth and iron over it. The heat will melt the wax, which will be absorbed by the paper. Replace the paper as needed until all wax is removed.
- Repeat for More Colors: If you want to add more colors or create layered designs, you can repeat the waxing and dyeing process. Remember that areas dyed in previous steps will be further protected by the new wax applications.
Tips for Toba-Inspired Batik Success
- Start Simple: Begin with straightforward Toba motifs. You can gradually tackle more complex designs as your confidence grows.
- Experiment with Colors: While traditional Toba batiks might have a specific palette, feel free to experiment with colors that resonate with you, while still respecting the bold contrast often seen in Toba art.
- Patience is Key: Batik is a process that requires patience. Don’t rush through the steps, especially the waxing and drying stages.
- Embrace Imperfection: Handmade batik has its own unique charm. Small drips or variations in wax application can add character to your work.
Beyond the Basics: Exploring Deeper
Once you’ve mastered the fundamental techniques, you can explore more advanced methods like:
- Batik Cap: Using a copper stamp (cap) to apply wax for faster and more uniform patterns.
- Multi-Color Dyeing: Layering dyes for rich, complex color effects.
- Batik Tulis: The most traditional and time-consuming method, where wax is applied entirely by hand with a tjanting.
To further enhance your understanding of Toba cultural heritage and its artistic expressions, consider exploring resources on Batak art and history. This could lead you to discover more about the intricate meanings behind specific patterns, potentially enriching your future batik projects. [Consider linking to a reputable cultural institution or museum resource here].
Your Batik Journey Awaits!
Creating your own batik, especially with the captivating influence of Toba-inspired designs, is a rewarding and deeply personal experience. It’s a way to connect with ancient traditions, express your creativity, and produce something truly unique. So, gather your supplies, unleash your inner artist, and embark on this beautiful journey of wax, dye, and imagination. The world of batik is waiting for you to make your mark!
Additional Information
It seems there might be a slight misunderstanding. The search results you provided are all related to Google services like creating Gmail accounts, files, blogs, and Google Meet meetings. While these are useful for digital organization and communication, they don’t directly relate to the art of batik or Toba-inspired designs.
Therefore, I will proceed with providing a detailed and analytical guide to “Create Your Own Batik: A Beginner’s Guide to Toba-Inspired Designs” based on the premise of traditional batik artistry, rather than incorporating the Google-related information.
Create Your Own Batik: A Beginner’s Guide to Toba-Inspired Designs
Batik is a captivating art form that has graced fabrics for centuries, originating in Indonesia. It’s a meticulous process of wax-resist dyeing, allowing for intricate patterns and vibrant colors to emerge. This guide will introduce beginners to the beautiful world of Toba-inspired batik, focusing on the cultural richness and techniques involved.
What is Toba-Inspired Batik?
Toba-inspired batik draws its motifs and aesthetic from the rich cultural heritage of the Batak people of North Sumatra, Indonesia, particularly those from the Lake Toba region. The Batak have a distinct artistic tradition expressed through carvings, textiles, and other crafts. Toba batik often incorporates:
- Symbolic Motifs: Many patterns carry deep meanings related to cosmology, social status, community life, fertility, and protection. Common motifs include:
- Gogo/Gugu: Representing ancestral spirits or the cycle of life.
- Gorga: Intricate carved motifs often found on traditional Batak houses, which can be adapted to batik. These can include stylized animals, human figures, and abstract geometric patterns.
- Horse Figures: Often symbolizing power, strength, and nobility.
- Floral and Vegetal Elements: Representing nature’s bounty and life.
- Geometric Patterns: Such as diamonds, lines, and curves, which can hold symbolic value.
- Color Palettes: Traditional Toba batik often features earthy tones like deep blues, indigos, browns, reds, and creams. While modern interpretations embrace a wider range, understanding the traditional palette adds depth to the Toba influence.
Materials You’ll Need:
For your beginner batik journey, gather these essential items:
- Fabric:
- Cotton: 100% cotton is highly recommended for beginners. It takes dye well and is relatively forgiving. Opt for pre-washed, tightly woven cotton.
- Silk: For a more luxurious feel, silk is excellent but can be more challenging for beginners due to its delicate nature and tendency to absorb dye quickly.
- Wax:
- Paraffin Wax: A common and affordable option for beginners. It’s easy to melt and apply.
- Beeswax: Offers better adhesion and a more subtle sheen. A blend of paraffin and beeswax is often ideal.
- Specialized Batik Wax: Available from art supply stores, these are formulated for batik and offer excellent properties.
- Dyes:
- Fiber Reactive Dyes: These are the best choice for vibrant, colorfast results on cotton and silk. They require a pH modifier (like soda ash) to set.
- Procion MX Dyes: A popular brand of fiber reactive dyes.
- Natural Dyes: For a truly authentic experience, explore natural dyes like indigo, madder root, or turmeric, but be aware they require more preparation and knowledge.
- Tools for Applying Wax:
- Tjanting (or Canting): A traditional tool with a small reservoir and spout for applying molten wax in fine lines and dots.
- Wax Brush: For applying wax to larger areas or creating broader strokes.
- Wax Pouring Pot: A double boiler system (one pot inside another with water) is essential for safely melting and controlling the wax temperature. Avoid direct heat.
- Pencil or Eraser: For lightly sketching your design onto the fabric.
- Dyeing Supplies:
- Buckets or Containers: For mixing and applying dyes.
- Gloves: To protect your hands from dye.
- Measuring Spoons and Cups: For accurate dye mixing.
- Stirring Sticks: For mixing dyes.
- Protective Covering: For your workspace (newspaper, plastic sheeting).
- Iron and Paper Bags/Newspaper: For removing excess wax.
- Design Inspiration:
- Reference images of Toba Batak art, carvings, and traditional textiles.
The Batik Process: Step-by-Step
Let’s break down the creation of your Toba-inspired batik:
Step 1: Design and Preparation
- Research and Sketch: Familiarize yourself with Toba motifs. Sketch your chosen designs lightly onto your fabric using a pencil or a specialized fabric marker that will disappear with heat or water. Remember to consider how the wax application will translate to the final design – areas covered in wax will remain the original fabric color.
- Prepare Your Fabric: Ensure your fabric is clean and dry. If using cotton, it’s often recommended to pre-wash it to remove any sizing that might interfere with dye absorption.
Step 2: Wax Application
- Melt the Wax: Carefully melt your wax using a double boiler. Do not overheat. The wax should be liquid but not smoking.
- Apply the First Layer of Wax:
- Using your tjanting, practice drawing lines and dots on a scrap piece of fabric. Achieve a consistent flow of wax.
- Transfer your design by dipping the tjanting into the molten wax and carefully drawing or filling in the areas that you want to remain undyed in the first color. Ensure the wax is applied thinly and evenly.
- For larger areas, use a wax brush.
- Drying: Allow the wax to cool and harden completely on the fabric.
Step 3: Dyeing – The First Color
- Prepare the Dye Bath: Follow the manufacturer’s instructions for mixing your fiber reactive dye. Ensure the dye is fully dissolved.
- Dye the Fabric: Submerge the waxed fabric into the dye bath. Ensure it is fully saturated. You can either dip-dye or use a brush for specific color application. For a more controlled approach with Toba-inspired colors, consider dip-dyeing sections of the fabric.
- Allow to Develop: Let the fabric sit in the dye bath for the recommended time, ensuring even color saturation. Stir occasionally to prevent uneven dyeing.
- Rinse and Dry: Once the desired color is achieved, rinse the fabric thoroughly in cool water until the water runs clear. Allow the fabric to dry completely.
Step 4: Repeating the Process (Waxing and Dyeing)
This is where the magic of layering colors happens.
- Apply More Wax: Once the fabric is dry, identify the areas you want to preserve from the next dye color. Apply wax to these areas using your tjanting or brush.
- Dye Again: Prepare and apply your second dye color to the fabric. Remember, any areas previously waxed will resist this new color.
- Rinse and Dry: Rinse the fabric and allow it to dry.
Continue this cycle of waxing and dyeing for each color you wish to incorporate into your Toba-inspired design.
Key Considerations for Toba-Inspired Designs:
- Layering and Symbolism: Think about how your chosen Toba motifs will translate through layers of wax and dye. Can you use wax to highlight the intricate details of a Gorga pattern?
- Color Progression: Plan your color sequence. Often, lighter colors are applied before darker ones, or you might use wax to create areas of contrast.
- Motif Placement: Consider the cultural significance of motif placement in traditional Batak art. While you’re creating your own interpretation, understanding these traditions can add depth.
Step 5: Removing the Wax
- Ironing: Once you have completed all your dyeing stages and the fabric is dry, the final step is to remove the wax.
- Place the batik between layers of absorbent paper (like newspaper or paper bags).
- Using a warm iron (not hot enough to melt the wax too quickly, which can spread it), press down on the fabric. The heat will melt the wax, and the paper will absorb it.
- Move the fabric and paper to a clean section and repeat until all the wax is removed.
- Final Rinse: You may want to give the fabric one last gentle rinse and let it air dry.
Troubleshooting for Beginners:
- Wax Cracking: If your wax cracks during application or handling, it will allow dye to seep into those areas, creating a “crackling” effect, which is a desirable characteristic in some batik styles. If you want to avoid this, apply the wax more smoothly.
- Uneven Dyeing: Ensure your dye baths are well-mixed and that the fabric is fully submerged. Stirring helps.
- Wax Not Sticking: Ensure your fabric is clean and dry before waxing.
Beyond the Basics:
As you gain confidence, you can explore:
- More Complex Designs: Incorporate finer details and a wider range of Toba motifs.
- Color Blending: Experiment with ombre effects or more nuanced color transitions.
- Different Fabrics: Try silk or linen for varied textures.
- Natural Dyes: Discover the beauty and complexity of traditional natural dyeing techniques.
Creating your own batik is a rewarding journey of artistic expression and cultural exploration. By understanding the techniques and drawing inspiration from the rich heritage of Toba-inspired designs, you can produce unique and beautiful textile art pieces. Enjoy the process of bringing these ancient motifs to life through the mesmerizing art of batik!